Move your libraries to a second drive or partition

 Image: geralt
”Commander Dave” Turner wants to move his documents, photos, and other data files to another drive.
Whether you move your data folders to a second drive or a new partition on your existing drive, you’re making a good move. You can better protect both your Windows installation and your libraries if you keep them in separate storage units. And you can significantly speed up your system, without losing storage space, by keeping Windows and your programs on an SSD, and your data on a hard drive.
I’m assuming here that you’ve already prepared a second drive or partitioned the first one, and that you have everything—Windows, programs, Documents, Music, and so on—on drive C:. If you’re not sure how to partition your hard drive, see How to partition a hard drive. We’ll give the second (and currently empty) drive the drive letter D:. If yours has a different letter, adjust the instructions below accordingly.
When the drives are ready, create a folder on D: with your name. Depending on who else is using the computer, you may also want to make folders for other users, as well as one called All Users, and repeat the instructions below for all of them.
Next, open your user folder. In Windows 7, click Start, then click your name in the top of the Start menu’s right panel. In Windows 8.1, go to the Search Charm, type %userprofile%, and select the folder whose name reads something like C:Usersyourname.
Once there, you can move your documents.

Right-click the My Documents or Documents folder. Select Properties.Click the Location tab.Click the Move button.In the resulting dialog box, go to your name folder in drive D:, create a new folder inside it called documents, and select that.After you click OK, click Yes to move your files.Then wait. The actual move may take a while.
When the process is over, repeat it with Pictures, Music, Videos, and any other folders that you want to move. Of course, in Step 4, give the folders appropriate names like pictures and music.
The AppData folder presents a problem. For one thing, it doesn’t have a Location tab. For another, it’s hidden. You may not even know it exists, but it contains data that you probably want on D:.
First, you have to open AppData—no easy feat since it’s hidden. In Windows 7, click Start and type %appdata%. In Windows 8.1, go to the Search charm, type %appdata%, then click the folder listed, which will probably be something like C:UsersyournameAppDataRoaming.
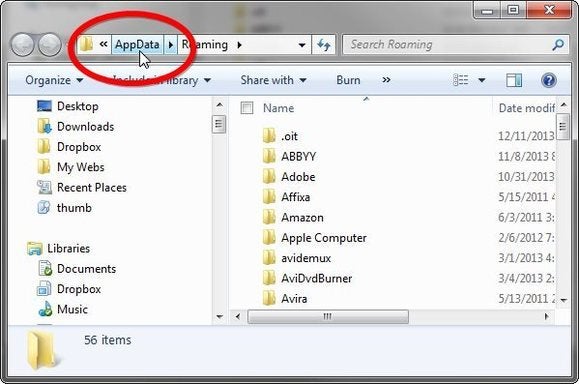
Actually, these instructions don’t bring you directly to AppData, but to the Roaming folder inside it. So click AppData in the address bar at the top of the window.

There you’ll find three folders, Local, LocalLow, and Roaming. They all have Location tabs, so you can follow the instructions above to move them.


