How to upgrade your laptop's graphics card

Pssst—there’s a secret that few in the PC gaming community know: You actually can upgrade your big-fat gaming laptop’s graphics.
But even the few who know it’s possible, believe it to not be worth the time and effort. After all, who wants to scour some obscure forum to find out whether blowing a wad of cash on a GPU from eBay will work? And then there’s the inherent risk of having the used GPU blow up after a month of use.
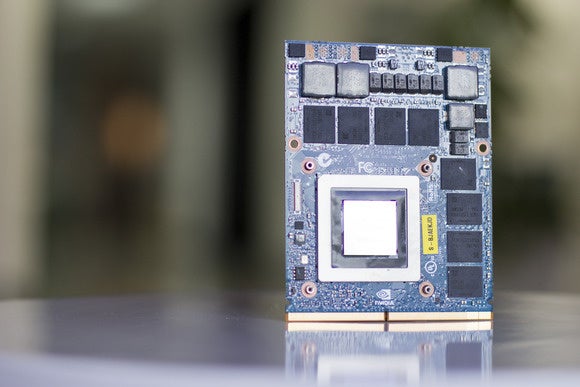
Enter Eurocom, a Canadian laptop vendor that in February began offering one-stop-shop upgrade kits for consumers who want to take the risk of performing the equivalent of open-heart surgery on a laptop. Even better, the kits cover competing vendors (as well as Eurocom itself, natch), such as Alienware. To find out how well these kits work and how the laptop upgrade process goes, PCWorld decided to upgrade a laptop and run the numbers.
 Gordon Mah Ung
You probably can upgrade your old gaming laptop’s graphics card, but is it worth it?
Temper your expectations
First, before you get too excited thinking you can get another a few years out of your four-pound, thin-and-light gaming laptop just by swapping out the GPU, you probably can’t.
Most of the upgrades available from Eurocom are aimed at the Big Berthas of laptop gaming that push the definition of portable. It’s almost as though the rules forbade any laptop weighing less than seven pounds from being upgraded.
That’s because these upgrade options are usually only for big laptops made by the manufacturer Clevo. Clevo’s not the only manufacturer, of course, but it’s the most common.
The good news is that even if your laptop is from a small boutique gaming company, painted red and has a custom keyboard on it, there’s actually a good chance it was made by Clevo, which presses dozens of different designs for dozens of different PC makers.
 Eurocom
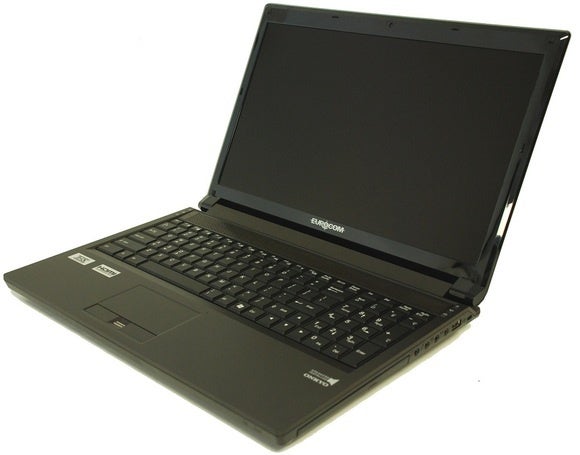
The Eurocom P150EM is actually manufactured by Clevo
Meet the Eurocom P150EM
The laptop I’m using for the upgrade is a Eurocom P150EM Racer. It’s generically known as the Clevo P150EM. Inside is an Ivy Bridge quad-core Core i7-3740QM, 8GB of DDR3 and a Seagate hyrid SSD along with a GeForce 675MX.
The GeForce 675MX itself is a Kepler-based GPU with 960 CUDA cores. It’s not a bad little card. (Note that Nvidia sold two different GPUs with the model number GeForce 675MX. The older one was Fermi-based and far slower.) The 675MX by itself is still usable if you want to turn down settings, but I’d had enough of turning settings down. So I had Eurocom loan us its GeForce GTX 980M kit, grabbed my screwdrivers and cranked up Lil’s John’s Turn Down For What? Kidding.
The actual upgrade
The physical part of the upgrade is fairly straightforward, but there are some things you should check off before you continue.
First, browse Eurocom’s VGA showroom to see whether the company sells a GPU for your laptop. Eurocom supports Clevo units in addition to Alienware units. Once you find a GPU for your laptop, read the fine print. You may need a certain-level BIOS on the laptop for it to work, and you may also need a certain-level power brick too. This may be enough to dissuade some from doing so.
For the undaunted, with BIOS updated, it’s now time to uninstall the Nvidia drivers on the laptop for the GeForce GTX 675MX card. You then power down, unplug and pull the battery out. Eurocom warns you should also take the usual ESD precautions, and wear a grounding strap. You can a live high-risk life we do and just do it without any of that, but at least discharge any built-up static electricity in your body, and rethink doing it on the retro shag carpet you just installed on a low-humidity day.
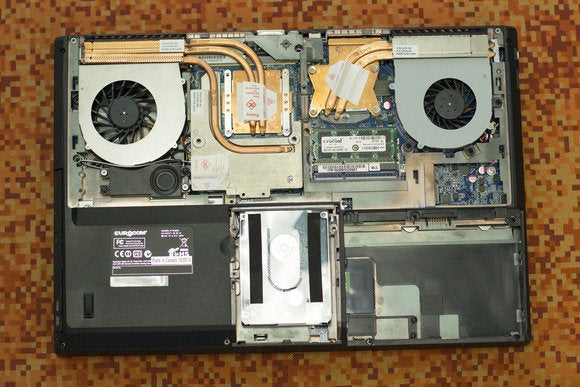
On the P150EM, remove four screws and slide off the bottom cover. There’s another door that covers the 2.5-inch drive too. If this were a full upgrade, I might ditch the hard drive for an SSD, or at least also slot in an mSATA SSD into the available slot to improve my drive access times. With just the main hatch open though, you have full access to the GPU and CPU.
 Gordon Mah Ung
The “Eurocom” P150EM is actually built by Clevo, which means the GPU upgrade for it should fit many other laptops too.
What about the CPU?
Much to Intel’s agitation, a lot of gamers really don’t need to stay with the fastest CPU if “all” they do is play games. If you’re concerned about battery life or do a lot of video encoding/editing, then yes, you might need the latest and greatest CPU. The chip in the P150EM is quite decent: The quad-core Ivy Bridge has a base clock speed of 2.7GHz and will Turbo Boost to 3.7GHz.
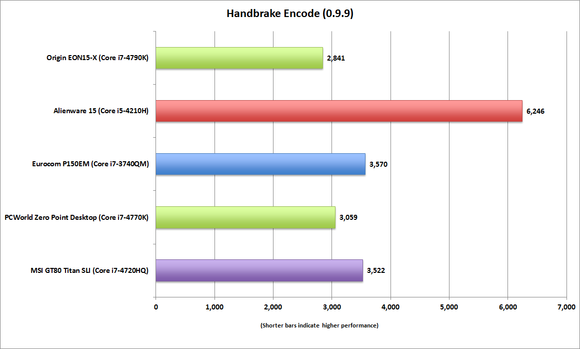
Haswell is certainly a better CPU, but honestly, Ivy Bridge still has plenty of life in it. Here’s the proof you don’t need to upgrade the CPU in this old war horse below. In pure mult-threaded performance, the Core i7-4720HQ is about the same speed as the older Ivy Bridge CPU in the EuroCom P150EM.
 PCWorld
In pure performance, the quad-core Ivy Bridge chip is just as fast as a similarly priced Haswell quad-core chip.
So just leave it alone. Need a project? Add an MSATA drive or more RAM to the P150EM.
The GPU matters more in gaming
I won’t say the same for the GeForce GTX 675MX. It’s a good part, but it’s not a GeForce GTX 980M. Even better, the GeForce GTX 980M upgrade kit features an 8GB frame buffer. You probably won’t need all that RAMm but when you start turning up features in GTA V and watch it consume more and more RAM, you’re glad you’re not “stuck” with 2GB of RAM.
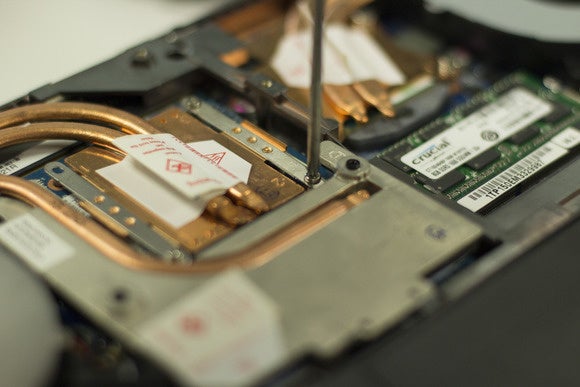 Gordon Mah Ung
You’ll need a couple of small-head Philips screwdrivers to remove the heat pipe from the GPU.
Remove the heat pipes
To access the GPU, you have to remove three screws from the heat pipe on the GPU core, and another three on the heat pipe on the voltage regulators and the RAM. Heat pipes, for those who don’t know, are cooling mechanisms that wick heat away where it can be expelled by blowing cool air through it.
Once all seven screws are removed from the two heatpipes, you use the paper tabs on the heatpipes to pull them off gently . The heatpipes may actually be stuck to the GPU from the melted thermal paste, so don’t be alarmed if it doesn’t budge. At the same time, use common sense on how much force to use to remove it. Gently rocking it around a bit may also help break the seal of the thermal paste.
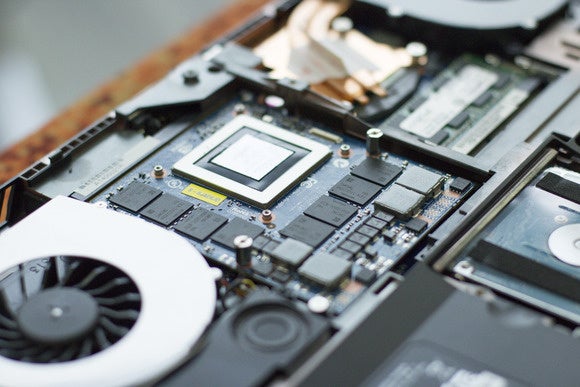 Gordon Mah Ung
Here’s what the P150EM looks like with the upgraded GeForce GTX 980M mounted.
With both heat pipes moved, you now have access to the MXM module. Two hex-shaped nuts that also must be removed. You can use a small box wrench, crescent wrench, pair of pliers or flathead screwdriver to break them loose. Once loose, back both off using your fingers. The module will not gently rock up at an angle and out of the slot. It’s like a giant RAM module almost in the way it slips into the slot.
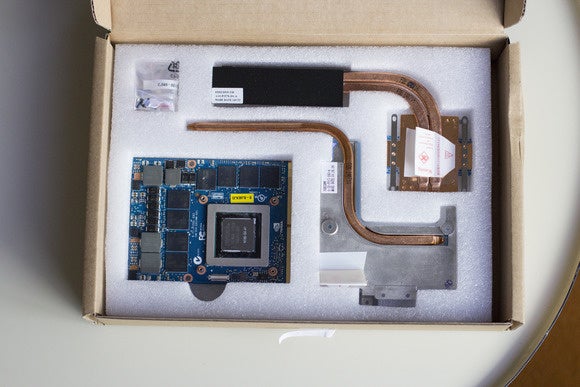 Gordon Mah Ung
The Eurocom kit comes with screws, mounts and new heat pipes to match the latest GPU you bought.
The kit for our unit included the MXM module or Mobile PCI Express Module, two heat pipes, screws and offsets for the GPU. Most of the screws and offsets looked the same, but I ended up using the new ones to be safe. The heat pipes looked a little different, so I decided to use the new ones, assuming they were matched to the 980M GPU.
Installing the new 980M card is a bit like a bit piece of RAM: You slide the edge connector part way into the slot and then push it a bit to make sure it’s fully seated while tilting it down.
Now insert the two hex nuts you previously removed and torque them down with a flathead screw driver just a tiny bit ,so they don’t back off. Install the heat pipes, making sure to avoid the typical rookie move of leaving the protective plastic cover on the thermal paste.
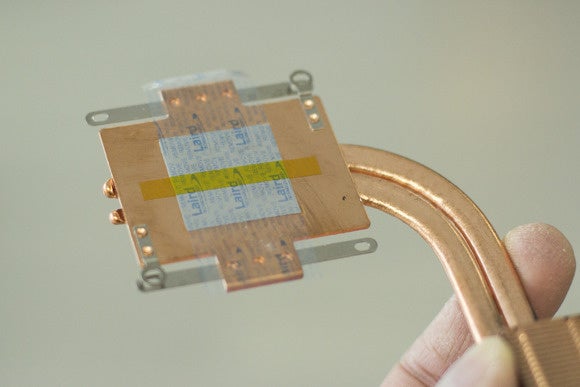 Gordon Mah Ung
The graphics upgrade kit I received from Eurocom comes with a thermal pad applied to the heat pipe. Just make sure to avoid rookie mistake #14: Remember to pull off the protective plastic sheet off.
Use caution when installing the GPU heat pipe
When attaching the heat pipe that goes on the GPU core itself, don’t get too crazy. Unlike a CPU, which has an integrated heat spreader to protect it, the GPU core is directly exposed for maximum cooling. Chipping a bit off the edge by pressing down too hard on it will destroy it. The heat spreader uses fairly small screws, so it’s tougher to damage the core itself. Exercise caution at this stage.
With everything installed, put the bottom cover back on. Install the battery and plug it in and power up. If you did it all correctly, it should power up and boot into Windows. However, remember that in most laptops, there’s integrated graphics, and it will boot to the IGP before using the discrete graphics card. You’re not quite in the clear yet.
Initially when I did the upgrade, I could use the “reference” drivers from Nvidia’s website. But those drivers would not recognize the new GPU and refused to install. After some head-scratching, I contacted Eurocom. And yes, that’s another reason why buying from Eurocom rather than used on eBay helps—I can turn to them for advice.
No more reference drivers
It turns out reference drivers don’t work with the new GPU. Nvidia’s drivers actually check hardware signatures before allowing installs. Drivers, from here on out, can only be obtained from Eurocom. The good news is if Eurocom goes kaput, there is a lively community which mods the drivers to work. Still, you don’t to go hunting for drivers. Because timeliness is extremely important to gamers, I asked Eurocom how long it takes to release drivers after Nvidia does. The company said pretty fast. How fast?The example I was given was that it took an employee three days to update Nvidia drivers for 64 separate cards. That’s pretty quick.
Once I had the proper drivers installed, it was time to check the card to see if I had installed it correctly. To do that I used Ungine 4.0. This synthetic benchmark will put a heavy load on the GPU while also displaying its temperature during testing. Eurocom tech support said I should see 90c to 95c for it to be normal. Mine were a little high, so I opened up the unit and torqued down the GPU on the heat just a tad more. I closed her back up and tested again and my temps had dropped down to the mid- to high 80s—within the normal operating range according to Eurocom.
Performance-testing my upgrade
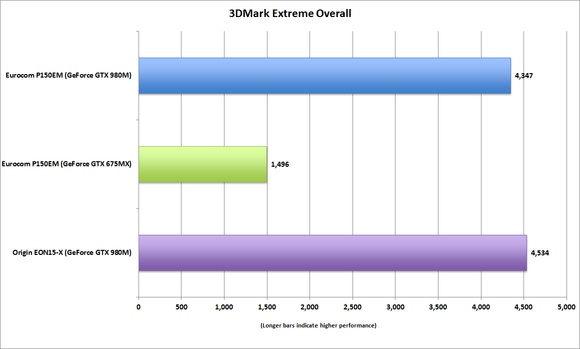
To see how it performs, I compared benchmarks I took before and after the GPU swap-out and threw in the Origin EON15-X laptop with GeForce GTX 980M to see if all was good. It was. There was a slight performance drop, but that could be from the faster CPU in the Origin as well as a slightly better cooling solution, as it’s a newer laptop. The improvement in this synthetic is huge over the original GeForce GTX 675MX though.
 PCWorld
For comparison, here’s Origin’s EON15-X with GeForce GTX 980M to see if we give up much performance on the upgraded P150EM. The answer is nope.
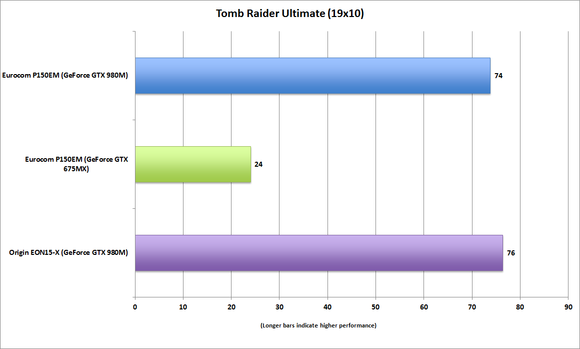
In an actual game I saw healthy bumps, too. With the original GeForce GTX 675MX, Tomb Raider set to Ultimate quality is out of the question at 1920×1080 resolution. With the GeForce GTX 980M in place, I saw 74 fps set to Ultimate. That’s above the magic number of 60 fps for all shooters. Middle-earth: Shadow of Mordor set on Ultra sits down at 32 fps on the original GPU. With the new one I was playing at 65 fps. I also ran Grand Theft Auto: V before and after and saw it go from unplayable (with almost everything turned to maximum) to playable. GTA V does tend to hammer GPUs depending on the settings. I intended to run more GTA V tests, but a DRM issue with the game put a stop to that. Why Rockstar? Why?!?
 PCWorld
980.The Eurocom P150EM with GeForce GTX 980M upgrade kit installed smokes the original GeForce GTX 675MX in Tomb Raider set to Ultimate.
Doing the math
The results weren’t surprising. It’s an awesome performance jump going from a GeForce GTX 675MX to a GeForce GTX 980M and no one can argue with that. What they’ll argue with is whether it makes sense. The upgrade kit from Eurocom costs $980. Holy kryptonite! Mobile GPUs have never been as cheap as their desktop counterparts (a retail desktop GPU is $600), but that’s still a good chunk of change.
Think about the options. If the main problem was not wanting to compromise on modern games because the old GPU was inadequate, the alternative is buying a new laptop. To get into a laptop with a GeForce GTX 980M-class graphics card, you have to spend at least $2,000. So from a certain point of view, spending $1,000 to get state-of-the-art performance saves you $1,000.
There’s also the argument that you could just sell the laptop to fund a new one, but I priced that out: You’d be lucky to sell this particular vintage laptop for $700. That still means $1,300 to get its replacement.
Another option: Sell the used GPU, too. While used desktops GPUs from 2012 don’t hold value, mobile ones obviously do. I’ve seen the GeForce GTX 675MX sell online for $300–not bad.
One final thing to consider: Eurocom does warranty the GPU for six months of use. The company won’t help you if your ham-fisted ways bust your laptop doing the upgrade, but if it the GPU melts itself in three months, Eurocom says it’s covered.
We know most people aren’t ever going to crack their laptop. Even with its high price and risks, however, there’s some justification for doing a graphics upgrade on a laptop if you want the performance and are willing to do the work.


