How to cure Windows 10's worst headaches


After the Windows 8 disaster, upgrading to Windows 10 is almost palpably refreshing. Microsoft’s new operating system brings back PC-focused features it should never have lost and adds some helpful new integrations with Microsoft services.
It’s not perfect, though.
Despite the many highlights of Windows 10—Cortana, virtual desktops, windowed Windows Store apps, the revamped Start menu, DirectX 12, among others—there are still some annoyances with the new operating system.
Windows 10 can reset your default browser if you upgrade; updates are now mandatory; and behind the scenes, the new OS is a file-sharing machine. Those are just a few of Windows 10’s notable headaches, but the good news is there are fixes for all these problems. Even better? Most are really easy to implement.
Let’s dig in.
Tame Windows 10’s forced updates
Windows 10 home users are now pretty much required to accept and install updates at the time and choosing of Microsoft. This can be disastrous if you get a bad update that bricks your system or puts it in an endless reboot cycle, or if you have to download updates on a metered connection.
Luckily, there are solutions for both.
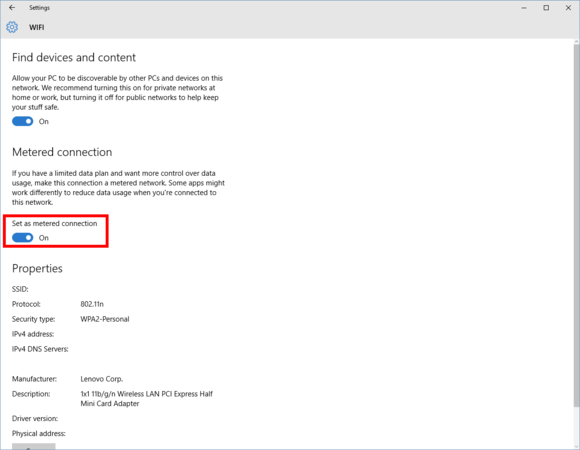
For the latter, all you have to do is set your Wi-Fi connection to metered—though note that Microsoft does not allow you to set ethernet connections as metered. To set your Wi-Fi as metered, go to Settings > Network & Internet >Wi-Fi > Advanced options > Set as metered connection. Once your connection is set as metered, Windows 10 will allow you to download updates at the time of your choosing.
Check out our tutorial for setting Wi-Fi connections as metered in Windows 10 for a detailed breakdown of how to best take advantage of the feature.
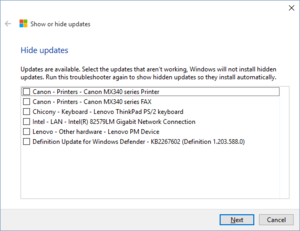
To deal with bad updates, a little preparation goes a long way. During the preview phase of Windows 10, Microsoft introduced a troubleshooter that lets you hide bad updates. First, however, you must uninstall the bad update by going to Control Panel > Programs > Programs and Features > View installed updates. Highlight the update that is trashing your system and click the uninstall button that appears. Once that’s done, run the troubleshooter utility and hide the borked, banished patch from the Windows Update list.
It’s a bit of a pain, but it works. Our recommendation: Download the troubleshooter to a USB stick so it’s ready to go when disaster strikes.
Exert control over forced restarts
The anxiety over forced restarts is somewhat overstated, because Windows has for years routinely picked the optimal time to reboot after downloading updates. The issue’s more pressing now if you used to download your updates manually, however—which, as we covered, you can’t do in Windows 10.
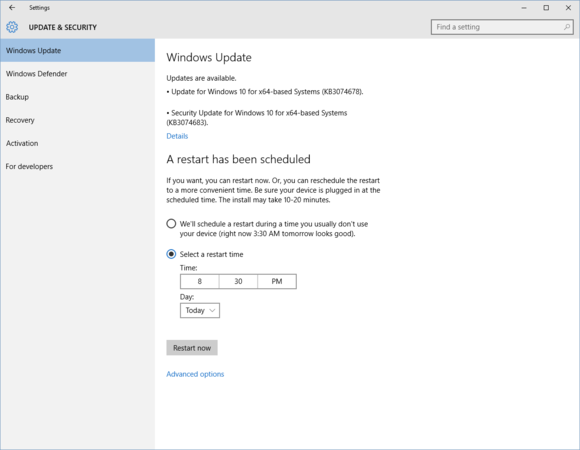
You can schedule reboots to occur at the time of your choosing by heading to Settings > Update & Security > Windows Update > Advanced Options > Choose how updates are installed, and then choosing Notify to schedule restart in the drop-down menu at the top of the page.
Once that’s activated, you’ll be prompted via a system notification to select a specific restart time every time an update has been downloaded and your PC needs a reboot. Our tutorial on how to schedule Windows 10 update restarts has more detailed information.
Windows P2P
Microsoft came up with a great idea for delivering updates in Windows 10: peer-to-peer networking. By default your Windows 10 PC shares system files with other PCs on your home network and across the big, wide Internet, downloading and distributing updates without relying on Microsoft’s servers alone.
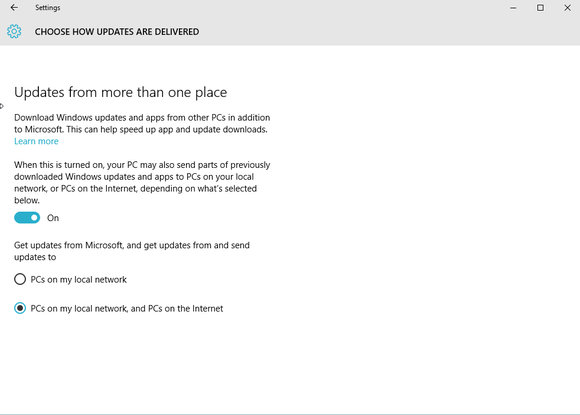
If you don’t like the idea of sharing your bandwidth to update strangers’ machine, turning off the P2P feature is easy. Go to Settings > Update & Security > Windows Update > Advanced Options > Choose how updates are delivered. There, turn the slider you see to Off to stop the feature entirely, or leave it on and select the PCs on my local network radio button to share updates only with other Windows 10 PCs in your home. (Personally, I like to keep the local network setting active.)
Scrolling the Apps List in the Start Menu

It’s great that the Start menu is back in Windows 10, but that “All apps” list organized alphabetically can be a pain to get through if you have tons of programs installed. For those times when you have to scroll down to the “W” section, click on any of the single-letter headings in the All Apps list. The alphabet will appear in the Start menu; simply select the letter section your chosen program resides in to zip there. Word, for example, would be found under W.
Very, very handy.
Where’s my default browser?
Did you just choose the Express Settings during installation during your Windows 10 upgrade? If so, then when you logged in the first time you may have discovered your browser was reset to Microsoft Edge. Here’s how to reset your default browser if that happened to you.
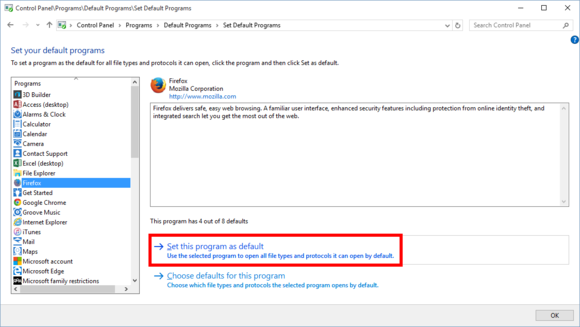
Go to Control Panel > Programs > Default Programs > Set your default programs. Let’s say Firefox was your browser of choice. You’d scroll through the list of programs until you saw Firefox, then you’d click on it and then choose Set this program as default. Done.
Stop Cortana from sending you to Bing
It’s no surprise that Cortana will automatically direct you to Bing for any web searches you conduct with the digital assistant. Cortana is powered by Bing, and using Bing helps Cortana learn more about you, and then better serve you in the future.
But if you’d rather stick with Google, Yahoo, Duck Duck Go, or any other search engine for your Cortana-driven web searches, there’s an easy solution: Use Firefox as your default browser.
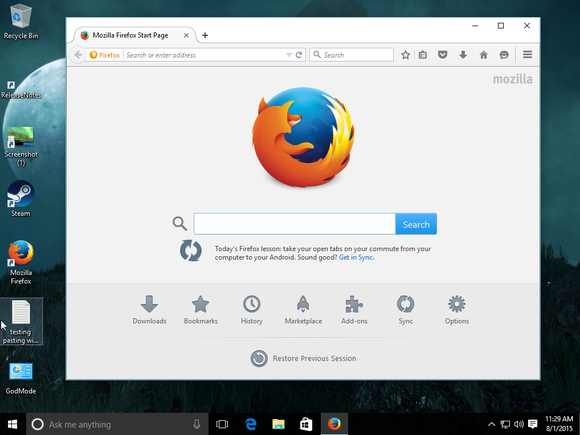
Mozilla added a nifty feature to Firefox for Windows 10 that automatically detects Cortana-initiated searches and sends them to your default search engine in Firefox. So if Google’s your default, that’s where you’ll end up when using the Cortana-Firefox combination.
You can also achieve this on Chrome with the Chrometana extension, but in my tests Firefox was far more efficient at getting you to Google than Chrometana was.
Death to Cortana?
If you ask me, Cortana is a great help. I use Microsoft’s personal assistant on my Android phone more often than Google Now simply because of Cortana’s deep integration with Windows 10.
But if you don’t want Cortana indexing your personal information all the time—which, to be fair is really no different from what Google already does with Google Now—it’s easy to disable the assistant. Click Cortana’s icon on your taskbar, select the notebook icon in her left-hand options pane, and click Settings. At the top of the next screen, simply set the slider “Cortana can give you suggestions, ideas, reminders, alerts and more” to Off. Boom! Cortana is out of your life.
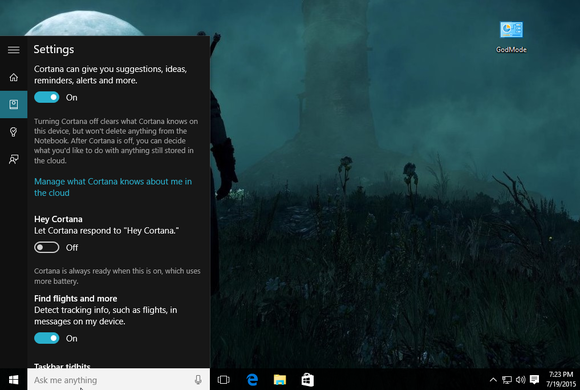
After you turn off Cortana, a new option appears that includes web searches in your results even without Cortana active. If you want to stick to local files when you search for something, you can turn the web searches off too.
For a more detailed look at turning off Cortana, including how to wipe any data Microsoft has saved about you in the cloud, check out our tutorial on killing Cortana.
PDFs in Edge
Windows 8 did a lot of things wrong, but what it did right—if you ask me—is include a stock PDF reader from Microsoft. Unfortunately, it was a Windows Store app, meaning you could only use it in full-screen or that horrible Windows 8 Snap mode, which was never as good as pure desktop Snap. But when the next-best alternative was Adobe’s Reader, Microsoft’s Reader was the one Windows Store app I learned to live with.
With Windows 10, Microsoft decided not to include its PDF reader by default. Instead, the Edge browser is your default PDF reader. The change hurts because Edge stinks as a PDF reader, and Windows apps now behave well when crammed in a window on the desktop.

Microsoft Reader’s icon.
Don’t despair, and definitely don’t run back to Adobe. Microsoft’s Reader app is still available in the Windows Store and you can download it for free. (If you don’t want to use a Windows Store app for PDFs, consider using Sumatra PDF or Foxit Reader instead.)
When that’s done, all you have to do is set Reader as your default for PDF documents. Head to Control Panel > Programs > Default Programs > Set your default programs. Once the installed programs list populates, scroll down and click Reader, then click Choose defaults for this program. On the next screen, click the PDF checkbox, then click Save and you’re done. You can also make Reader the default for other file types, including XPS and TIFF. If you don’t know what those file types are it’s best to leave Reader strictly for PDFs.
The same steps can also be used to set another PDF reader, like Sumatra or Foxit, as your default program.
What did we miss?
Those are our tips for fixing some common annoyances in Windows 10. Got any more? Let us know in the comments.


