External drive died? Your data may still be easy to recover

 Image: Michael Homnick/IDG
Tawffic Abdul Wahab ‘s external hard drive stopped showing up on his system. Not a great thing to have happen. However, unlike with an internal hard drive, he’s not necessarily looking at an expensive recovery bill.
Note: The following is for external drives that are out of warranty and/or without a recovery contract. Use those if they apply, though warranties generally don’t include recovery. If you need the data, you might want to try these tricks anyway.
[Have a tech question? Send your query to [email protected].]
Falling bridges
How can I recover a dead drive, you say? Well, external drives utilize what’s called a bridge board to handle communications between the USB/FireWire/Thunderbolt controller and the native SATA that the drive understands. Sometimes, it’s this bridge board that fails, while the drive inside remains perfectly usable.
 PCWorld
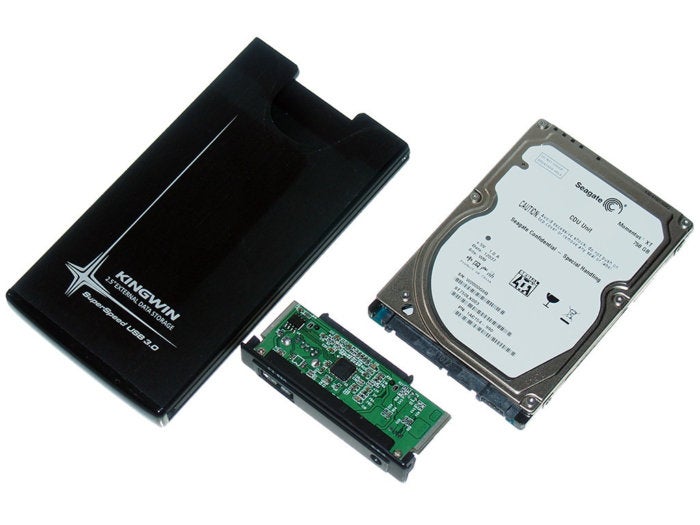
A third-party Kingwin 2.5-inch drive enclosure with the bridge board and hard drive removed. If you’re drive is this type, you’re in luck–drives from major vendors can be extremely difficult to disassemble.
To find out whether the drive is still viable, you’ll need to transplant it–that is, remove it from the case, then attach it to the SATA controller of a desktop PC, or the spare 2.5-inch bay of a laptop if you happen one of those (and the drive is a 2.5-inch type and thin enough). If you want it to remain external, you can buy a new enclosure and use it in that.
Screws or demolition
With most third-party, and some 3.5-inch major vendor enclosures, it’s easy to remove a drive. Simply remove a few screws to open the case, and remove a few more to detach the drive. At worst, you might have to pry off a few rubber feet to reveal the screws. Alas, especially with major vendors’ 2.5-inch external drives, you might wind up prying apart glued plastic pieces to get to the hard drive itself.
Before you indulge in mayhem, however, make sure there aren’t any pry- or pop-off panels that hide screws, and search the vendor’s site carefully for instructions. You’re unlikely to find them with the big-name drives, as what you’re about to do is a warranty-voiding procedure, but at least give it a try. You can also check YouTube to see if someone else has plotted your course for you.
If you have no luck with instructions or figuring out a non-destructive method to open the drive, you’ll need to resort to X-acto knives and spudgers (dedicated prying tools). First try running a razor or knife along a seam, the use a spudger to try and pry it apart. It may give way politely, but more likely you’ll have to use significant force. Remember that the drive is useless unless you can remove it, so you may have to resort to brute force. Just don’t hurt yourself, or the relatively fragile drive inside.
Once removed from the enclosure, attaching the drive to a PC is simple. Just dig up, or buy a SATA cable, open the PC case, and attach the drive using a SATA cable to a free SATA port. There are almost always spare SATA power leads coming off the power supply. Find one and attach it to the drive. Power up the PC and if the drive is okay, it will spin up and appear in Windows Explorer. If it doesn’t, check Disk Manager to see if it’s a foreign file system. You might have to boot using a live version of Linux, or use a Mac if it’s EXT or HFS.
If the drive spins up (you’ll hear it if it does–put your ear next to it.) but then spins down, or doesn’t appear under Windows or Disk Manager, you have one more trick you can try–freezing the little sucker. This can keep a wonky bridge or controller chip alive long enough to pull off a few vital files. I’ve succeeded with this trick multiple times, and failed a lot more.
If all else fails
If none of those tricks work, it’s time for data recovery service. Assuming the data is that important and can’t be replaced. Services vary in cost from expensive to very expensive, and are available from most electronics and office box stores. You can also find services such as Drive Savers online.
Note: Some drives, such as Seagate’s Backup Plus Fast, run two drives in RAID 0 where data is divided between the drives. You’ll need a recovery program such as R-Studio to recover data from a setup like this.


